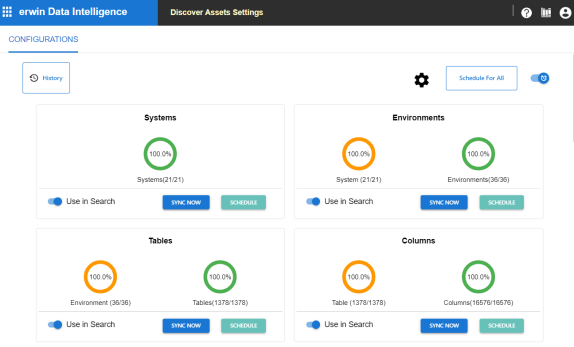
On the Discover Assets Settings page, you can configure the Discover Assets module with respect to asset property and value synchronization with respective modules. After synchronization for assets is completed, you can discover and analyze their status. You can also schedule synchronization jobs, control the asset types available in the Discover Assets module, and view activity logs.
To configure the Discover Assets module, follow these steps:
- Go to Application Menu > Settings > Discover Assets.
- On the configuration page, use the following options:
-
History (
 )
) -
Use this option to view activity logs of all synchronization activities.
-
(
 )
) -
Use this option to switch Include Extended Properties option ON. The extended properties that are configured as filters are displayed in the Discover Assets module. You can configure the extended properties as filters for technical and business assets.
-
Schedule For All
-
Use this option to schedule a synchronization job for all asset types.
- (
 )
) -
Use this option to enable or disable scheduling of synchronization jobs for all asset types. This enables the Schedule For All option, and scheduling jobs at individual asset level is disabled.
- On the asset type card, use the following options:
- Use in Search (
 )
) -
Use this option to enable asset discovery for an asset type.
- Sync Now
-
Use this option to start synchronization activity immediately for an asset type.
- Schedule
-
Use this option to schedule synchronization jobs for an asset type. This option is available only when the Schedule For All option is disabled.
The Discover Assets Settings page appears.

Scheduling Synchronization Jobs
Apart from scheduling a sync job, you also can manually sync the asset properties and values individually on the asset type card. To sync them manually, on an asset type card. click Sync Now.Apart from scheduling synchronization jobs for all assets, you can schedule them for individual asset types.
To schedule synchronization jobs for asset types, follow these steps:
- On asset type cards, click Schedule.
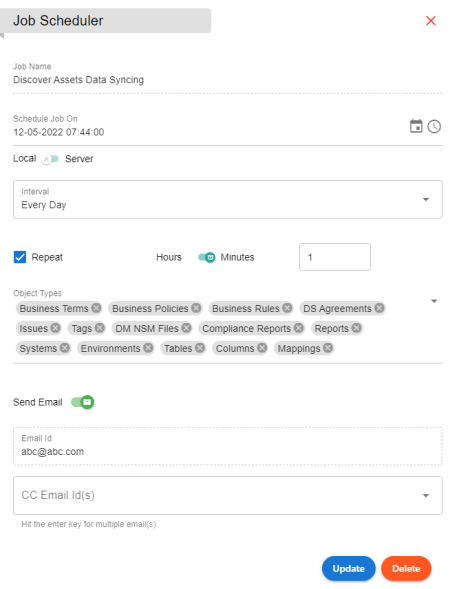
- Enter appropriate values in the fields. Refer to the following table for field descriptions.
- Local: Indicates that job uses date and time on your local machine
- Server: Indicates that the job uses the date and time of a machine where your application is deployed
- Only Once: Indicates that the job runs only once
- Every Day: Indicates that the job runs everyday
- Every Week: Indicates that the job runs weekly
- Every Month: Indicates that the job runs monthly
- Click Submit.
The Job Scheduler page appears.

|
Field Name |
Description |
|---|---|
|
Job Name |
Specifies the job name. For example, Systems_1650468274963. This field auto-populates a job name and is uneditable. |
|
Schedule Job On |
Specifies the date and time of the job. For example, 03-24-2020 11:45. |
|
Local or Server |
Specifies whether the job uses local or server time. |
|
Interval |
Specifies the frequency of the job. |
|
Repeat |
Specifies whether the job repeats every day. This field is available only when Interval is set to Every Day. Additionally, you can set the repeat time based on hours or minutes. For example, 1 hours or 60 minutes |
|
Object Types |
Specifies the object types for which the job should be scheduled. This field is available only when you use the Schedule For All option. |
|
Send Email |
Specifies whether job notifications are sent to your email ID and the email IDs mentioned in CC Email Id(s) field |
|
Email Id |
This field is auto-populated with your email ID. You receive email notifications about the scheduled job from the administrator's email ID. |
|
CC Email Id (s) |
Specifies the email IDs that receive job notifications other than you. Enter a comma-separated list of email IDs that should receive email notifications about the scheduled job. For example, ab.dav@xyz.com, cal.kai@xyz.com |
The synchronization job is scheduled.
|
Copyright © 2023 Quest Software Inc. |